
This job was indeed much harder that I anticipated. I have replaced lower control arms before, but this one really challenged me. Main reason for that was the need to 'fight' with the new control arm to get it back into position - by raising the hub, lowering it, wiggling, pulling, pushing, kicking, banging... All those things which totally did not take place during my LCA replacement on my 99 BMW 328i. It just rather easily fit back in.
Not here, so be warned.
Lower front control arm (LCA) comes with a balljoint and two bushings pressed in. Mine were 240 CAD each from the Acura dealer near Toronto. Somehow, I could not find cheaper aftermarket options (my Bimmer had plenty of them on eBay, not for MDX though or at least for my year).
First side took me 2hrs to remove LCA and 2 to put a new one back and complete the job. The other side went smoother with the experience I just gained. 1hr to remove, still around 2 to install, as I ran into other unexpected problems (with my tools).
And here is something interesting - I would have NEVER finished that job without a tool you might never think is necessary for automobile work - a came-along cable puller. I was able to remove the LCA with 'standard tools', but absolutely no go to put it back in place without that brilliant tool. So either take your risk and do without it, or go get yourself and standard (about 2 tons pull) came-along - mine was 20 bucks on sale, a very much multi-purpose tool indeed.
OK, here is what you need to do:
1. Raise the car and secure it in at least two points
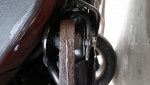
2. Loosen rearward (from now let's call it RW) control arm bushing bolt on the bottom (top nut is welded in so no worries, it will not turn) but do not remove it all the way! Just break and loosen a bit.
![Image]()
3. Loosen frontward (FW) control arm bushing bolt. Again, do not remove, just loosen.
![Image]()
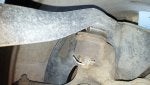
4. Remove the pin on the ball joint.
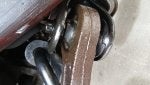
5. Loosen and remove the nut holding the ball joint.
![Image]()
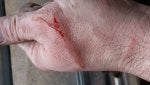
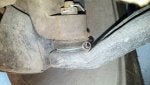
6. Use a pickle fork to remove/loosen the ball joint from the knuckle. Usually banging really hard is required. If your pickle fork went in all the way and the balljoint still did not pop out from the knuckle, keep the fork all the way in and hit it hard from the top (to force a direct upward/downward movement). Mine was so seized that this was required. If the ball joint does not completely pop out of the knuckle, don't worry and keep going with the procedure.
![Image]()
7. When the balljoint completely pops out/or is loosened in the knuckle, you may need to support the control arm a bit and proceed to removing both loosened bolts holding the control arm. My FW one was extremely tight to turn - I thought I was going to break the bolt. On the passenger side, I stepped on the ratchet with my foot to get it to turn, and on the driver side I kept using a long breaker bar to get additional force. Took a long time to remove that bolt.
![Image]()
8. RW bolt will come out easy.
9. Continue to remove the ball joint completely from the knuckle until the whole control arm falls free to the ground. You may need to raise the wheel hub to free the balljoint completely, I raised it by the brake rotor (notice the jack in the picture and the very rusted and old rotor which I didn't care much about as it was to be replaced anyway). Be careful when doing that though. a) do not put the jack under the ball joint itself, as this will not help to remove it, b) do not bend a metal brake dust cover, or remember to 'unbend it' c) do not damage your rotors - use a piece of wood to protect it.
![Image]()
10. Wiggle around and the control arm should fall out.
![Image]()
- REASSEBMLY -
This can be tough, so be creative.
10. Put the FW bushing into its slot, push (kick) it in if needed. Does not have to be precise, just get it a bit in.
![Image]()
11. Make sure that the RW bushing is roughly positioned OK to go into its slot, but don't force it just yet.
![Image]()
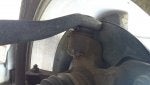
12. Put the balljoint back into the knuckle. I used Anti-Seize on the inside of the knuckle to stop two metal pieces from rust-bonding. This step may be hard, raising/lowering of the wheel hub and kicking it hard may be required. As soon as the balljoint makes its way into the knuckle, use the original nut to tighten it by hand. Then lift up the hub by raising underneath the balljoint to nicely force it in more and tighten more.
![Image]()
12. Kick the hub hard from the side to force the FW bushing nicely into position. Kicking should be enough to get that accomplished. Try inserting the original bolt back through the frame mount and control arm bushing and tightening it up.
12b. If totally unable to align the opening for the bolt to go it, get out the came-along. Attach one end (with the pulley on it) of the came-along to the opposite side of the cars underbody. Find a very solid spot on the frame, or engine cradle. Attach the other end of the came-along to the .... well here I won't tell you what I attached it to as some will think I'm an idiot. Well, be creative and find a spot somewhere near the wheel hub that will allow to be pulled to get the FW bushing bolt opening aligned. Worked like a charm for me, few pulls and beautifully in proper position. Push and tighten the bolt.
![Image]()
13. Raise the wheel hub (by the bottom of the ball joint is OK) to roughly the normal wheel height (as if the car was sitting on the ground).
14. Kick the RW end of the control arm into its position. This has absolutely did not work for me. came-along all the way. Again, find a good mounting spot on the opposite side of the vehicle's underbody and loop the came-along's cable around the control arm's (or grab it if you have a large hook or something). Pull and it will gracefully go into its position (it has no other choice as the two other mounting ends have already been re-attached). Push the bolt from the bottom up and tighten.
![Image]()
![Image]()
15. Tighten all three spots and you're DONE!
16. Oh, don't forget the pin on the new balljoint.
![Image]()
By far, the hardest part was aligning the LCA back into position so good luck with that.
Not here, so be warned.
Lower front control arm (LCA) comes with a balljoint and two bushings pressed in. Mine were 240 CAD each from the Acura dealer near Toronto. Somehow, I could not find cheaper aftermarket options (my Bimmer had plenty of them on eBay, not for MDX though or at least for my year).
First side took me 2hrs to remove LCA and 2 to put a new one back and complete the job. The other side went smoother with the experience I just gained. 1hr to remove, still around 2 to install, as I ran into other unexpected problems (with my tools).
And here is something interesting - I would have NEVER finished that job without a tool you might never think is necessary for automobile work - a came-along cable puller. I was able to remove the LCA with 'standard tools', but absolutely no go to put it back in place without that brilliant tool. So either take your risk and do without it, or go get yourself and standard (about 2 tons pull) came-along - mine was 20 bucks on sale, a very much multi-purpose tool indeed.
OK, here is what you need to do:
1. Raise the car and secure it in at least two points
2. Loosen rearward (from now let's call it RW) control arm bushing bolt on the bottom (top nut is welded in so no worries, it will not turn) but do not remove it all the way! Just break and loosen a bit.

3. Loosen frontward (FW) control arm bushing bolt. Again, do not remove, just loosen.

4. Remove the pin on the ball joint.
5. Loosen and remove the nut holding the ball joint.

6. Use a pickle fork to remove/loosen the ball joint from the knuckle. Usually banging really hard is required. If your pickle fork went in all the way and the balljoint still did not pop out from the knuckle, keep the fork all the way in and hit it hard from the top (to force a direct upward/downward movement). Mine was so seized that this was required. If the ball joint does not completely pop out of the knuckle, don't worry and keep going with the procedure.

7. When the balljoint completely pops out/or is loosened in the knuckle, you may need to support the control arm a bit and proceed to removing both loosened bolts holding the control arm. My FW one was extremely tight to turn - I thought I was going to break the bolt. On the passenger side, I stepped on the ratchet with my foot to get it to turn, and on the driver side I kept using a long breaker bar to get additional force. Took a long time to remove that bolt.

8. RW bolt will come out easy.
9. Continue to remove the ball joint completely from the knuckle until the whole control arm falls free to the ground. You may need to raise the wheel hub to free the balljoint completely, I raised it by the brake rotor (notice the jack in the picture and the very rusted and old rotor which I didn't care much about as it was to be replaced anyway). Be careful when doing that though. a) do not put the jack under the ball joint itself, as this will not help to remove it, b) do not bend a metal brake dust cover, or remember to 'unbend it' c) do not damage your rotors - use a piece of wood to protect it.

10. Wiggle around and the control arm should fall out.

- REASSEBMLY -
This can be tough, so be creative.
10. Put the FW bushing into its slot, push (kick) it in if needed. Does not have to be precise, just get it a bit in.

11. Make sure that the RW bushing is roughly positioned OK to go into its slot, but don't force it just yet.

12. Put the balljoint back into the knuckle. I used Anti-Seize on the inside of the knuckle to stop two metal pieces from rust-bonding. This step may be hard, raising/lowering of the wheel hub and kicking it hard may be required. As soon as the balljoint makes its way into the knuckle, use the original nut to tighten it by hand. Then lift up the hub by raising underneath the balljoint to nicely force it in more and tighten more.

12. Kick the hub hard from the side to force the FW bushing nicely into position. Kicking should be enough to get that accomplished. Try inserting the original bolt back through the frame mount and control arm bushing and tightening it up.
12b. If totally unable to align the opening for the bolt to go it, get out the came-along. Attach one end (with the pulley on it) of the came-along to the opposite side of the cars underbody. Find a very solid spot on the frame, or engine cradle. Attach the other end of the came-along to the .... well here I won't tell you what I attached it to as some will think I'm an idiot. Well, be creative and find a spot somewhere near the wheel hub that will allow to be pulled to get the FW bushing bolt opening aligned. Worked like a charm for me, few pulls and beautifully in proper position. Push and tighten the bolt.

13. Raise the wheel hub (by the bottom of the ball joint is OK) to roughly the normal wheel height (as if the car was sitting on the ground).
14. Kick the RW end of the control arm into its position. This has absolutely did not work for me. came-along all the way. Again, find a good mounting spot on the opposite side of the vehicle's underbody and loop the came-along's cable around the control arm's (or grab it if you have a large hook or something). Pull and it will gracefully go into its position (it has no other choice as the two other mounting ends have already been re-attached). Push the bolt from the bottom up and tighten.


15. Tighten all three spots and you're DONE!
16. Oh, don't forget the pin on the new balljoint.

By far, the hardest part was aligning the LCA back into position so good luck with that.
 .
.