Acura MDX SUV Forums banner

2005 MDX base model aux inputs install (PIE X3)

59K views 33 replies 11 participants last post by  Skarface2002  
#1 ·
I found the Internet posts on removing the dash parts and stereo very helpful. After doing an install myself to add auxiliary inputs to a base single cd 2005 Acura MDX unit I thought I’d post some photos and additional documentation to help anyone else doing something similar.

What I’ve installed (so far): a P.I.E. X3 and X3-HON03 input adapter (the combo ran $79 plus shipping or $1 additional in purchase from www.myradiostore.us). I can confirm that with the non-Bose, non-Nav, non-DVD single CD player with built in XM radio, the P.I.E. X3 does work well and allows for retention of XM radio. This provides three RCA inputs that you can toggle between using a switchbox. You simply pick input 1, 2, 3, or CD changer/XM. This will not allow for control (other than volume) of a device such as an iPod using the steering wheel controls or head unit controls, however such options may exist in the near future from Acura or aftermarket manufacturers.

How I plan to use it: initially with an mp3 player (works great with an iPaq) using the headphone output of the player. I plan to add a Bluetooth audio receiver (high quality audio, such as A2DP) with possibly Bluetooth phone support (phone audio outputting to the car stereo). An iPaq could play audio to this receiver without wires, while retaining a fully digital signal (as opposed to analog audio transmitters). There aren’t many on the market yet, so I may be trying to hack my own Bluetooth audio receiver together. I could also add a DVD player for rear passengers that supports DVDs and MP3 DVDs, and the audio out of that could then be connected to one of my inputs.

Some notes about the P.I.E. X3. I had read that with cd changers a cd must be playing for it the X3 work, or XM must be on. P.I.E. informed me that XM must be connected but not necessarily in service, or playing music with reception. This is correct; my aux inputs do work just fine when I’m in the garage without XM service, and without a subscription. I do plan on subscribing and wanted to keep the XM option available.

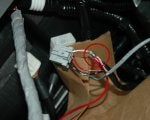
I’ve located my P.I.E. X3 box behind the dash between the drivers feet and the passengers feet. There is a cavity located essentially just to the right of the gas pedal. This provides essential space and more accessibility to the box when changing the RCA wired connections in the future. There was some space down behind the radio, but locating the X3 box there would have been tight and meant modifying input cables required stereo removal again. More details about that location and my 12v power source below with photos.

Be careful when working with your stereo if you do not disconnect the battery. If you do disconnect the battery, have your radio security code handy.

I’d like to thank the friends that helped me with the install in a relatively new car and didn’t call me crazy like the others.

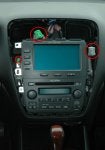
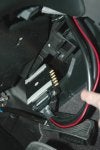
Stereo with the plood already pulled loose:
 

Attachments

#2 ·
Base MDX with stereo in, plood removed

The plood is removed using the coat hanger trick found online (thanks!!). I used a heavy gauge wire as I didn’t have any wire coat hangers. I did want to elaborate on this technique a bit as mine didn’t come out quite as smoothly as it sounded. It was easy once I was sure I was doing it right.

Here’s the dash with the one piece plood removed (vents and buttons are attached to the plood):
Note that there are three connectors circled, these are unplugged as you pull the plood out. There are six screws holding the stereo in, but only two are still in place and visible in this photo. They are easy to locate.
 

Attachments

#5 ·
Base 2005 MDX aux input install

The plood removal technique involves inserting a heavy wire with a hooked end into the vent and pulling the vent/plood assembly forward. I was surprised that it took quite a bit of pulling for this to begin to come forward. It’s important to note that you are NOT pulling on the vent flaps, but on the back of the vent surround. To get my wire there, I had to carefully poke it past the edge of a wire mesh screen (pictured below) and then rotate the hook and pull back towards me. Take note of the wire mesh screen, and location of the hook below. I hadn’t read anything about a mesh screen or what exactly I was pulling on. Perhaps the screen isn’t on older MDX models.

Here's how you insert the hanger or wire from the front (you would of course being doing this to remove the plood, the photo is illustrating this after removal to show it from different angles):
 

Attachments

#9 ·
I’ve located the X3 adapter brain unit down between the driver’s right foot and the passenger’s left foot. Behind the center console there is a cavity that was fairly open on my MDX. It seemed to have a molded plastic bottom, so I wasn’t too worried about locating my unit here and having it interfere with other wires etc. Again, I like the fact that I can un-Velcro the unit and easily switch up the RCA inputs as my audio needs (dreams) change. The dash won’t have to be taken apart again. As I’m posting photos below, I should now mention that I’ve run an extra 12v (switch positive and ground) wire (grey in the photos) to this location for future use with any audio devices (such as a Bluetooth receiver). I’ll talk about my power source in a minute.

The unit is pulled out in this photo, otherwise you wouldn't see it.
 

Attachments

#12 ·
You can see above where the wires from the unit begin into the dash. I did this by starting with the wiring down by the gas pedal, and feeding the two smaller white ends (larger female end first) then the red power wire up to the stereo cavity. There is a tight fit between a white plastic tube (some sort of vent?) and a metal bar (careful not to shave the insulation of the wire on here, it’s a little sharp edged). With a little negotiating you should get the wires through from below up into the stereo cavity. This wasn’t too difficult, you can see pretty easily how to make this work.

Here’s where the wires head up into the dash from below. The wires could probably be hidden even a bit more from view than pictured. This shows the how the unit is fully recessed into the back dash cavity down by the floor.
(repeat photo, I know)
 

Attachments

#15 ·
Now we need a 12v switched power supply (we don’t want it on when the car’s off!). One obvious location that could be used is the cigarette lighter which is a switched 12v white with red stripe wire. This wire connection seemed like it would take a little effort to get to, but I noticed an untapped connection in the back right of my cavity that also had a white with red striped wire. I (ok we, I enlisted the help of some friends for my project so I must give them credit for much of this work) tested this plastic plug w/wires (taped downwards to another cable with blue tape). It contained a good ground wire (black of course) some sort of red wire (didn’t seem to get a reading, a switch return perhaps?) and a white with red-stripe that was 12v switched power (perfect!).

General view illustrating the location of this unused plug with switched power:
 

Attachments

#18 ·
Plug after connecting the red X3-HON03 adapter’s wire to the white with red-stripe wire. The wire insulation was shaved back to make this connection. You’ll also see a grey cable with wire’s that I’ve connected to this power source and the ground wire (ground wire connection is not needed for just the X3 install – it must get its ground from the XM or radio unit connection). This grey wire will provide me with 12v switched power for future use; I’ll roll up the wire and store it down by the X3 unit. For that future connection I’ll need both ground and positive, so even though the X3 doesn’t need us to tap into the ground wire I’ve done it for my own purpose.

Plug after soldering my wires to the plug’s wires. This was then wrapped with insulating tape of course!
 

Attachments

#19 ·
That’s pretty much it, now I have an X3 input unit with three inputs that I can access and change up the RCA inputs when needed. I will have to find a place for the switch box. I’m considering getting a used replacement piece of plastic for the plastic wood molding around the gear shifter. Then I could use this piece (not my original, which I would remove and save) to Dremel out a hole for my switchbox in front of the shifter.

I may run a 1/8” plug to hook up to devices with headphone outputs in my center console. Similar work has been documented here. I might also use the hole in the top of the “not an ashtray” drawer under the stereo to store an input cable. This hole is pretty small, so a plug wouldn’t fit through, but cutting an audio wire and re-assembling it would allow the wire to pass through without enlarging the hole. And I might run a wire if I ever add a DVD entertainment system, such as one with a player located under the passenger seat.
 
#20 ·
I hope this might be of use to others considering an aux input install, particularly with the PIE X3 that retains XM. I should mention the two things I felt some might not like about this setup: it needs a switch box to select sources and while you're on aux 1, 2, or 3 you still see the XM data on your screen. If I do anything creative when installing the switch or audio wiring, I'll post details or photos here. Post or PM if you have questions.

Andy
 
#23 ·
Re: audio input quality comparison

I can't compare the audio quality to a tape or FM adapter on my MDX, as I don't have a tape player in my MDX nor have I used an FM input with the MDX. In previous vehicles I found direct line inputs to be the best quality when compared with the other two options.

I don't notice a difference in sound quality between a CD playing in the deck vs. the same cd or wave file playing from an external source input through the X3. If you have a low quality/bitrate mp3 type file, you'll hear the effects of compression.

If you're asking about a tape adapter you probably have a different head unit than I do, so make sure the PIE X3 or other adapter you're using is compatible with your unit model and year.
 
#24 ·
radio removal

Your step by step removal guide was great.

I do have one question though.

I have a Sirius Wired Fm Modulation Relay I would like to install on my radio but don't know if there is a standard connection for it on the back of the radio

I have seen other diagrams of the back of the radio which showed a FM antenna socket input where presumably the FM antenna would go.

Do you know anything about this?
 
#25 ·
I've installed aftermarket decks that have one of the few standard FM antenna inputs on other vehicles. I did not recall seeing this on my Acura MDX, and reviewing the photos seems to confirm that.

If you have wiring diagrams you could probably splice into the correct wires for the FM antenna, but you have other options.

If you can avoid using a modulated signal (the FM input) and have your audio go directly into the deck you'll get much better audio quality.

Rather than using an X3 from PIE, it sounds like you have no need for multiple/switched inputs and retaining XM. There are other adapters (Blitzsafe and probably PIE) that will simply swap out the XM/CD changer input and use that port directly (with no XM pass-through capability). See this post for an example, but keep in mind the correct adapter varies by MDX model year. That would give you one set of RCA inputs to connect your Sirius radio to that wouldn't modulate the signal and would sound much better. If you wanted to keep the XM too then you'd want to use the PIE X3 or I think there might be another newer adapter on the market that also retains XM.

Check out the posts here on FM input / adapters...most conclude it's not the best option.

Andy
 
#26 ·
Bravo,
Thank you for detailed information and pictures. I've easily removed my 2004 base stereo to check for connector type.

Unlike 2005 model, my stereo does not have a XM capability. However I found an unused 14-pin male connector on the back, that is probably intended for CD changer. Although I have no special buttons for it upfront, so I'm still unsure how the controls going to work if at all. In 2004 MDX there are only 4 buttons of source upfront (AM/FM/TAPE/CD). So if this jack works at all on 2004, it's likely on CD source.

In case anyone interested in size of the stereo on 2004 model, it's:
7 1/8" x 4" x 6.5" (Width x Height x Deep). The trip computer does not appears to be dependent on the base stereo, so it will be safe to replace.

I haven't purchased an iPod or similar player, so I'm still looking to get either replacement MP3 capable stereo, or external mini-player. I would really love to find a double-din DVD/CD player that will fit in, however my requirements are dual-zone and PAL/NTSC support. Unfortunately I haven't been able to find clear documentation which models do support PAL DVDs as well.